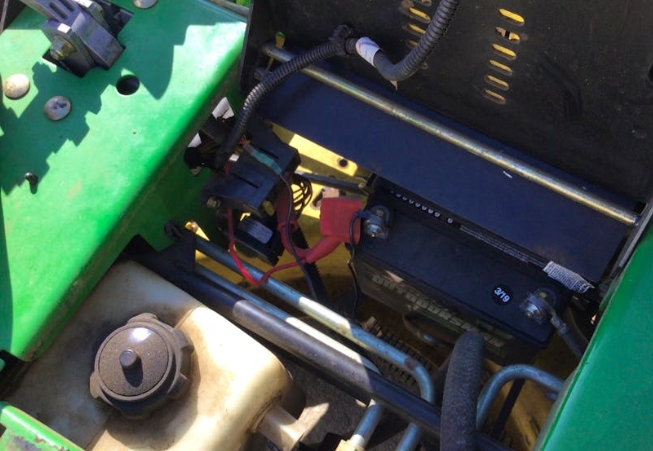
Maintaining your John Deere Z425 is essential to ensure its longevity and performance, especially when it comes to electrical components. Whether you’re facing issues like blown fuses or a malfunctioning PTO switch, learning how to rewire your Z425 can save time and money.
To rewire a John Deere Z425, first gather the necessary tools, including a multimeter and wiring harness. Next, access the mower’s electrical components such as the PTO switch and ignition switch. After testing for faults using a multimeter, replace or rewire damaged parts. Reassemble the mower and perform a test run to ensure everything works correctly.
In this comprehensive guide, we’ll walk you through everything you need to know, from understanding the mower’s wiring system to safely rewiring it step by step.
Contents
- 1 Understanding the Electrical Components of the John Deere Z425
- 2 Common Electrical Issues and How to Identify Them
- 3 Step-by-Step Guide to Rewire the John Deere Z425
- 4 Maintaining the Electrical System of Your John Deere Z425
- 5 Conclusion
- 6 Looking for high-quality, budget-friendly tractors for your farm or lawn?
- 7 FAQs
Understanding the Electrical Components of the John Deere Z425
Before jumping into rewiring, it’s important to familiarize ourselves with the key electrical components that make up the John Deere Z425. This knowledge will help us understand how each part works and what might go wrong.
Key Components Include:
- Battery: Provides the power needed to start the mower.
- Fuse Box: Protects the electrical system from overloads.
- PTO (Power Take-Off) Switch: Engages the mower blades when turned on.
- Ignition Switch: Powers up the mower and starts the engine.
- Solenoid: Acts as a relay to send electrical current from the battery to the starter.
Common Symptoms of Electrical Issues:
- Blown Fuses: The fuse box burns out frequently.
- Starter Issues: The engine won’t turn over when the key is turned.
- PTO Switch Failure: The blades don’t engage, even when the switch is on.
Knowing the parts and their functions helps us diagnose problems accurately. If you’re noticing any of the above symptoms, rewiring might be necessary.
Common Electrical Issues and How to Identify Them
Owning a John Deere Z425 comes with its share of responsibilities, and electrical problems are among the most common issues we encounter. Here’s a rundown of the most typical electrical issues, along with how to identify them.
1. Blown Fuses
Blown fuses are a common problem. If your mower refuses to start or suddenly shuts off, the fuse box could be to blame. If you find that your fuse burns out frequently, it’s a sign of an overloaded circuit or a short somewhere in the wiring.
Solution: Check the fuse box for any visible damage. You can replace a blown fuse easily, but repeated issues might indicate a deeper wiring fault.
2. PTO Switch Malfunction
A malfunctioning PTO switch can prevent your mower blades from engaging, making the mower useless for cutting. This issue is often caused by a fault in the wiring to the PTO switch or the switch itself.
Solution: Use a multimeter to test if the switch is receiving power. If it’s not, rewiring may be necessary.
3. Dead Battery or Charging Issues
A dead battery or problems with charging can also signal wiring issues. If your battery drains quickly or won’t charge, the wiring connected to the battery might be faulty.
Solution: Check for loose or corroded connections and ensure that the battery is charging properly by testing with a voltmeter.

Step-by-Step Guide to Rewire the John Deere Z425
Rewiring your John Deere Z425 might sound daunting, but it’s manageable when broken down into steps. Follow these guidelines for a smooth rewiring process.
Step 1: Gather Tools and Safety Gear
Before we begin, let’s gather everything we need:
- Multimeter or test light
- Replacement wiring harness
- Fuse box and fuses
- Screwdrivers, wrenches
- Electrical tape and wire cutters
Ensure you’re working in a well-lit and ventilated area. Remember, safety comes first!
Step 2: Access the Electrical Components
To access the electrical components:
- Remove the engine cover by unscrewing the bolts.
- Disconnect the battery to avoid any electrical shocks.
- Locate the fuse box, PTO switch, and ignition switch. These are usually under the seat or near the control panel.
Step 3: Test the Components for Faults
Using a multimeter, check if each switch and component is receiving the correct amount of power. If the multimeter shows a reading of 0 or below the recommended voltage, this means the component or wiring is faulty.
Step 4: Replace or Rewire Damaged Parts
If testing shows that a switch or wire is faulty, you’ll need to replace or rewire it:
- For the PTO Switch: Disconnect the wiring harness from the switch and replace it with a new one. Ensure all connections are tight and secure.
- For the Fuse Box: Replace the fuse if blown. If the box itself shows damage, replace the entire unit.
- For General Wiring: If you see any frayed or burnt wires, cut them off and replace them with fresh wires. Secure them with electrical tape.
Step 5: Reassemble the Mower
Once all faulty parts have been replaced, carefully reassemble the mower. Start by reconnecting the battery and then refitting the engine cover and seat.
Step 6: Final Test Run
Turn the ignition and check if everything works smoothly. If the mower starts without any issues and the blades engage correctly, congratulations—you’ve successfully rewired your John Deere Z425!

Maintaining the Electrical System of Your John Deere Z425
Rewiring might be a one-time fix, but proper maintenance can help avoid future problems. Here are some key maintenance tips:
1. Regularly Check for Damaged Wires
Wires can become frayed over time due to wear and tear. Regularly inspect your mower’s wiring and replace any damaged sections to prevent short circuits.
2. Keep the Battery Charged
A weak battery can lead to other electrical issues. Make sure to charge the battery regularly, especially during the off-season.
3. Clean the Terminals
Battery terminals can accumulate dirt and corrosion. Clean them periodically using a wire brush to ensure a good connection.
4. Replace Fuses Periodically
Even if the fuses aren’t blown, it’s a good idea to replace them once every couple of years to avoid sudden failures.
Conclusion
Rewiring a John Deere Z425 might sound like a big job, but with the right tools, knowledge, and a step-by-step approach, it’s a task we can handle ourselves. Understanding the mower’s electrical components and regularly maintaining the system can help avoid future breakdowns, saving us both time and money.
By following this guide, we hope you feel empowered to tackle rewiring your John Deere Z425 with confidence. Remember to perform regular checkups and stay proactive in maintaining your mower’s electrical system.
Looking for high-quality, budget-friendly tractors for your farm or lawn?
With Minno Agricultural Machinery, you’re not just purchasing a machine; you’re investing in reliability, flexibility, and innovation. Our affordable prices combined with personalized support make Minnuo the go-to choice for farmers who want quality and great service without breaking the bank.
FAQs
The John Deere Z425 is powered by a Briggs & Stratton 22-horsepower V-twin gas engine with a displacement of 724 cubic centimeters, making it perfect for handling large lawns.
Blown fuses can be caused by overloaded circuits or short circuits in the wiring system. Regularly inspect and maintain the wiring to avoid such issues.
If your PTO switch doesn’t engage, check if the switch is receiving power using a multimeter. If it’s not, rewiring or replacing the switch may be necessary.

